Posts

Showing posts from 2019

Reset Sitecore Admin Password using SQL

Image
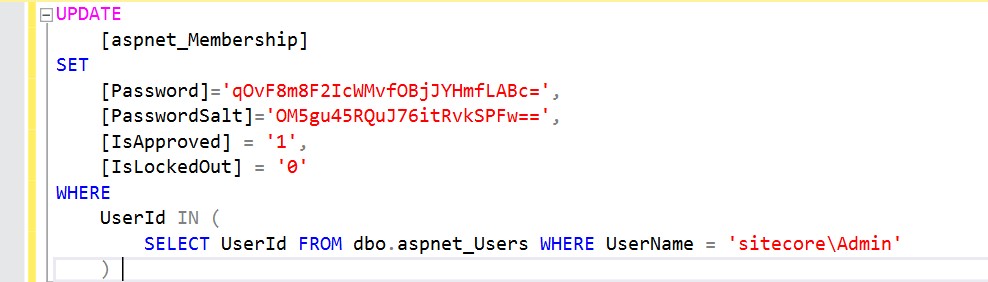
In case you forget the Sitecore Admin password and you are not able to login into the Sitecore. Now the question is If you are not able to login into the Sitecore system then How can you rest the password? There is one solution to reset the Sitecore Admin password to “b” by SQL Server database.  Perform the below steps to reset the Sitecore Admin password to “b”: Login into SQL Server Database Go to the respective Core Database, open a new query window. Execute the below query. UPDATE      [aspnet_Membership]  SET      [Password]='qOvF8m8F2IcWMvfOBjJYHmfLABc=',      [PasswordSalt]='OM5gu45RQuJ76itRvkSPFw==',      [IsApproved] = '1',      [IsLockedOut] = '0' WHERE      UserId IN (         SELECT UserId FROM dbo.aspnet_Users WHERE UserName = 'sitecore\Admin'     )  The above script will reset Admin User Password to “b”. Happy Sitecoreing  ðŸ˜Š

Custom Personalization Rules in Sitecore 9

Image
Personalization allows you to deliver the target the component in which your visitor showing interest. For example, visitor visits or browse specific product feature, specification, details, etc. on website. So, you show personalized content to the visitor on the bases of his previous behavior on the website. You can create personalization rule on bases of The goal, Campaign, custom facet, etc. Your website will respond to the bases of above-defined rules and display or hide specific component or change its behavior. To start with custom personalization, you need to perform the below steps: Step 1:    Go to the path “ /sitecore/system/Settings/Rules/Definitions/Tags ” right-click on Tags and add new customize Tag (I have given a name CustomPersonalization):

Display Anonymous Contacts in Sitecore Experience Profile

Image
After installation of Sitecore 9 update 2, I observed that Experience profile does not show anonymous contact on experience profile but it exists in xConnect Database. To show to anonymous contact in experience profile we need to enable anonymous contact and perform the below steps: Step 1:  Go to the xConnect root path “ C:\xconnect root path\App_data\jobs\continuous\IndexWorker\App_data\Config\Sitecore\SearchIndexer” , o pen “ sc.Xdb.Collection.IndexerSettings.xml ” file and IndexAnonymousContactData to true as below: <IndexerSettings>     <Type>Sitecore.Xdb.Collection.Indexing.IndexerSettings, Sitecore.Xdb.Collection</Type>     <LifeTime>Singleton</LifeTime>     <Options>        <SplitRecordsThreshold>25000</SplitRecordsThreshold>        <IndexPIISensitiveData>false</IndexPIISensitiveData>        <IndexAnonymousContactData>true</IndexAnonymousContactData>     </Options> </IndexerSett

Work with Custom Facet in Sitecore 9

Image
In this blog, you can find details about how to set, fetch and update custom facet models to XDB. To know about how to create a custom facet model please find my previous blog  here . Facet will be saved with respect to the Contact, whether it is new or existing contact. If contact does not exist, then create a new contact and add it to XDB if it exists then get that contact first. I am starting this blog by setting new custom facet properties, later fetching the existing facet and updating the properties, and saving it to XDB.  You need to use  client.SetFacet()  method to set or update facet. Add a new custom facet: In this following example, I am adding the  CustomFacetInformation  facet on contact. This contact does yet not have the  CustomFacetInformation  facet. You need to create a new object of facet then assign properties and set it to contact. using (XConnectClient client = SitecoreX

Create Custom Facet in Sitecore 9

Image
Sitecore XConnect provides some default collection model to save user data like Personal Information, Email, Address, etc. the complete list you can find in an assembly named  Sitecore.XConnect.Collection.Model.dll . Sometimes as per our business requirement, we need to add some additional information to the collection model with the respective user. In this blog, I will explain how to create a user custom facet model and register it to the Sitecore XDB collection model. You need to perform the below steps to achieve this: Step 1: Create a Custom Facet Model [FacetKey(DefaultFacetKey)] [Serializable] public class CustomFacetInformation : Facet { public const string DefaultFacetKey = "CustomFacetKey"; public CustomFacetInformation() { } public string CarModel { get; set; } public string PassportNumber { get; set; } public string PreferredLanguage { get; set; } } Here DefaultFacetKey is facet key name. You can get

Collect basic information about Sitecore installation

Image
To get support from Sitecore, Sitecore team ask us to provide basic information about Sitecore website with other details like Log files, Web config, App config, etc for further investigation. There is two way to generate this information either automatically or manually. 1.         Automatically: ·        For Sitecore XP 8.2 Initial Release — 8.2 Update-6, Sitecore XP 9.0 Initial Release and 9.0 Update-1: <site name>/sitecore/admin/supportpackage.aspx ·        For Sitecore XP 8.2 Update-7, Sitecore XP 9.0 Update-2 and later: <site name>/sitecore/admin/supportpackage 2.         Manually: ·        Create a new folder for store files. ·        Navigate to the website root folder copy the following files to the folder that you just created: §   \web.config §   All contents of the  \App_Config §   \Global.asax  and  \Global.asax.cs §   \sitecore\shell\sitecore.version.xml §   All contents of the  \sitecore\shell\hotfixes  folder (if it exists).