Posts

Showing posts from 2021

Checkbox Rendering Parameter Taking Null Value If It's Unchecked

Image
Issue: I have a client requirement that each component should be flag-based to turn it on or off. I have used a checkbox in rendering parameters for the implementation of this functionality and applied that rendering parameter template on each component rendering. While reading these values, If I checked the Checkbox IsComponentVisiable it returns "1" and unchecked the Checkbox, it returns me null. var flag= RenderingContext.Current.Rendering.Parameters["IsComponentVisible"] I was surprised about its behaviour that instead of "0" it returns null? I raised the support ticket to Sitecore to understand that am I doing something wrong or if it's the default behaviour of the checkbox field when we use it as the rendering parameter? Sitecore suggested: Find below the Sitecore Team Response on my Ticket: Based on the provided information we would like to define the scope of the current case: Issue def
URL Redirects Module in Sitecore

Image
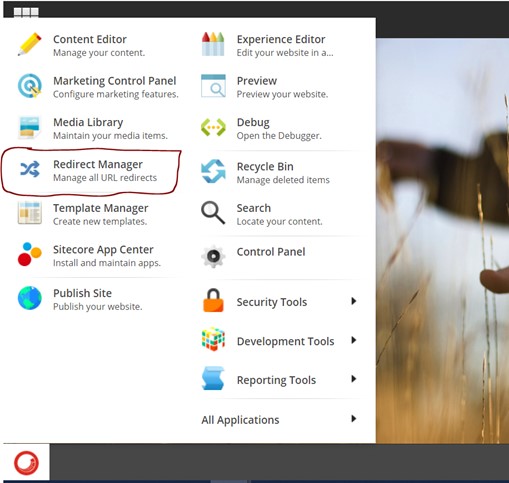
In one of my projects, my client's requirement was to implement the URL Redirect feature from his existing SharePoint website to the New Sitecore website. My client suggested the "Constellation.Feature.Redirects"  Redirect module to accomplish the functionality.  In this blog, I am giving insight on this module installation, what features I have used and the challenges I have faced during implementation. I want to give a huge thanks to Richard Cabral aka Sgt Sitecore who guide and helped me with the implementation. Installation: To install the URL redirect module please find below the link in which all the steps are mentioned in detail:  Constellation.Feature.Redirects Steps: Constellation.Feature.Redirects are managed via NuGet. In Visual Studio, fire up the Package Manager console and install it into a Web Application project: PM:> Install-Package Constellation.Feature.Redirects After installation, you must build an

Pipeline Profiling Processors

Image
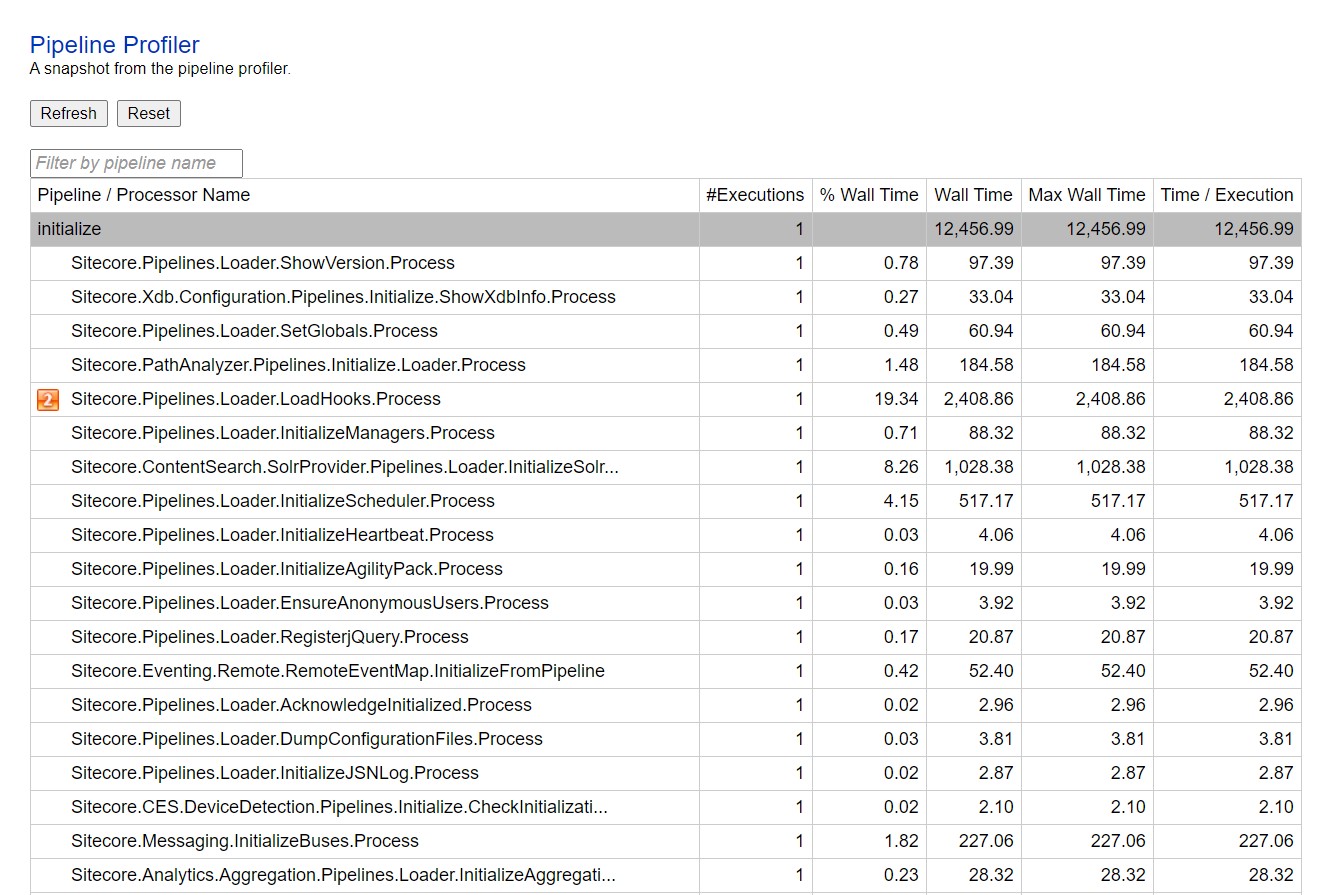
Pipeline: It’s a sequence of processes that executes in a defined order to perform the task into Sitecore. In Sitecore, there is a number of inbuild pipelines and we add our custom pipelines into that. We can change the order of the pipelines as per our requirements. When we write our custom pipelines then it’s difficult to find out on deployment environment that it's executing or not. To check the sequence of execution there is a good feature provided by Sitecore is the Pipeline Profiler. The pipeline admin page is used to view all the pipeline processors that are defined into the Sitecore and the sequence in which they will execute. By default, The pipeline Profiler page is disabled, and you need to enable it manually. To enable Pipeline profiling, perform the below listed steps: Add the following key <add key="env:define" value="Profiling" /> to Web.config <appSettings> section. Login into the Sitecor

Unit Test for Sitecore Custom Personalization Rule

Image
I assume that in your career path you all become chance to hands on implementation for Sitecore Custom Personalization Rule. If you did not, then I have already described in detail about Custom Personalization Rule implementation in my one of previous blog. See the Blog Post: Custom Personalization Rules in Sitecore Today I am going to share with you about implementation of Unit Test for Custom Personalization Rule. Custom Personalization Rule business logic: protected override bool Execute(T ruleContext) { if (_pageContext != null && !string.IsNullOrWhiteSpace(_pageContext.baseketValue)) { var deliveryType = _basketDetailsService.GetBasket(_pageContext.basketValue).deliveryType; if (deliveryType != null && deliveryType== DeliveryType.CashOnDelivery) { return true; } } return false; } In above sample piece of code, I have created two Serv

Sitecore Custom EXM Unsubscribe Page

Image
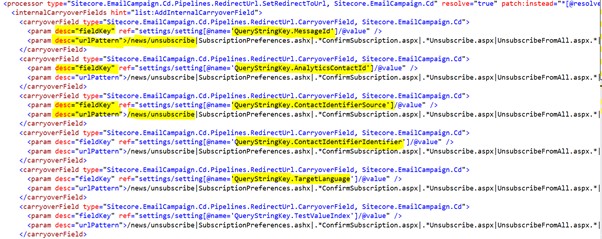
If you ever got a chance to implement the email campaign functionality using the default email template in EXM, then you may have observed that each email send to the users contains two links that are Unsubscribe and Unsubscribe from all from future emails campaigns. Requirement: When the user clicks on the Unsubscribe link in the email, instead of redirecting it to Unsubscribe.aspx page which is the default, the user should land on the custom page developed into the Sitecore. On the custom page, the user can choose the options from which list the user wants to unsubscribe. Solution: When the user clicks on the unsubscribe link, Sitecore default redirects to the RedirectUrlPage.aspx with decrypted query string parameter named ec_eq . The ec_eq query string parameter is the encrypted query string, and it is handled by the RedirectUrlPage.aspx process which handles the decryption of those parameters and returns Contact ID, Message-Id and others. On

Sitecore Geolocation Service API

Image
 Sitecore provides location details of the user using Sitecore Geolocation API . It gives the detail of the Time zone, City, IP Address, region, Country, Post Code, Longitude and Latitude, etc. It is advantageous for marketers or developers in terms of visitor information, tracking, and personalization.  Using this information, you can apply the personalization rules for different geographical locations, tracking goals and page events. In this blog, I will let you know about How to enable the Sitecore Geolocation Service API and by using this API fetch the details of the user location using an IP Address. Enable Sitecore Geolocation Service API: First, you need to raise a request to Sitecore to activate the Sitecore IP Geolocation service. For the same, you can refer to Sitecore Documents. See the document: Set up Sitecore IP Geolocation Retrieve Geolocation Data: First, you need to make sure that XB and Analytics tracker is work

Execute PowerShell Script with Sitecore Scheduler

Image
If you have a requirement like execute PowerShell script in form of a scheduler then Sitecore Scheduler provides an option for the same. For Example, you want to delete some Sitecore Items after a specific date or remove the ideal user at some specific time. For that, you have written a PowerShell script instead of C# code and you want to schedule the PowerShell Script with a Scheduler. Then Sitecore Scheduler provides you a good option to execute PowerShell Script. If you want to know How to Install the PowerShell module with your Sitecore instance and the ideas about the PowerShell command and Scripts then, please refer series of blog posts written on: PowerShell with Sitecore . Here I am giving you an example to create a Sitecore Item using PowerShell Script and Schedule that Script by Sitecore Scheduler. You can update your PowerShell script as per your requirement. Step 1: Go to the PowerShell ISE, you can open it by Sitecore Launchpad or

Jobs in Sitecore

Image
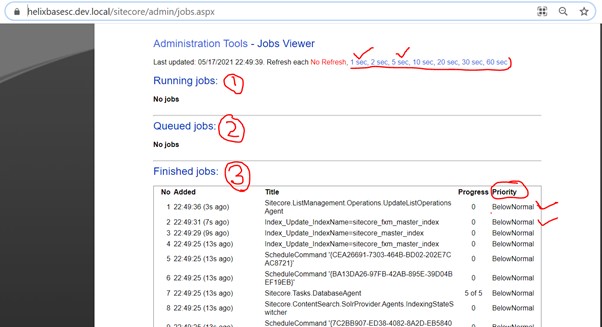
Sitecore Jobs are used to calling the task or method which takes more time to execute. It allows us to start and execute the task in the background without affecting the other task and thread's executions. We can monitor the jobs via Admin section in {Sitecore- Instance}/sitecore/admin/jobs.aspx page . So, in one line you can say Sitecore Jobs are perfect options to run the long execution methods. Now the question is why Sitecore Job? Sitecore calls the <job> Pipeline to execute each job. Sitecore calls a separate thread for each job execution so that your code will be executed in the background without affecting any other method, thread block, etc. Sitecore also provided an admin section page to monitor the jobs. You can set the status and priority of the jobs. You can run multiple jobs at the same time without any interference. Sitecore Job provides job-related events like job:starting, job:started, job:ended , so tha

Wildcard Item in Sitecore

Image
If the Sitecore item name is an asterisk (*) then the item is called a wildcard. So, Wild Card is a special page in our Sitecore content tree represented by the item name "*". Reason to create Wild Card Page: If we need to create large numbers of the content page using the same page template then we must apply the same rendering and presentation details on every content page. It’s very hectic for a content editor to create several pages and manages those pages into a content tree. To overcome this issue Wild Card Page is the best solution in which our all the data source we reside outside of the home node, somewhere in Global folder and we will have only a single wild card page which will serve all the data source pages. Let’s quick start, I have some products Under the Global/Product Folder , and I am creating a single Wild card page for all the products, that will display the information on the product: Create a Wild Card page i

Sitecore Installation Error: Failed to Start Service 'Sitecore Marketing Automation Engine'

Image
 Error: [------- XConnectXP0_StartServices [2] : ManageService -----------------------] [XConnectXP0_StartServices [2]]:[Updating] sc903xconnect.dev.local-MarketingAutomationService Waiting for service 'Sitecore Marketing Automation Engine - sc903xconnect.dev.local-MarketingAutomationService (sc903xconnect.dev.local-MarketingAutomationService)' to start... Waiting for service 'Sitecore Marketing Automation Engine - sc903xconnect.dev.local-MarketingAutomationService (sc903xconnect.dev.local-MarketingAutomationService)' to start... Waiting for service 'Sitecore Marketing Automation Engine - sc903xconnect.dev.local-MarketingAutomationService (sc903xconnect.dev.local-MarketingAutomationService)' to start... Waiting for service 'Sitecore Marketing Automation Engine - sc903xconnect.dev.local-MarketingAutomationService (sc903xconnect.dev.local-MarketingAutomationService)' to start... Waiting for service 'Sitecore Marketing

Import CSV Data in Sitecore Using PowerShell: Part-3

Image
In my previous blog , we had discussed Sitecore PowerShell Command and Scripts. In this blog, I am discussing with you about How to Import CSV Data in Sitecore using PowerShell Scripts? To do the same you need to read the CSV file rows and create Sitecore Items into the Content Tree for each row then assign the column values of the row into the respective Item Field. There are two options: Write your own customized PowerShell Script and Import CSV Data. Use the inbuilt Data Importer tool that comes with Sitecore PowerShell Extension .  Option 1: Perform the Below steps to Import the CSV Data into Sitecore: First, you will need a CSV file. If you have Excel Sheet, then go to the File Menu and click on Save As option and change the format and save it into CSV format. Suppose you have a CSV file with the number of rows and each row has several columns with predefined values. Here I am taking the below CSV file for an

PowerShell Commands and Scripts for Sitecore Item: Part-2

Image
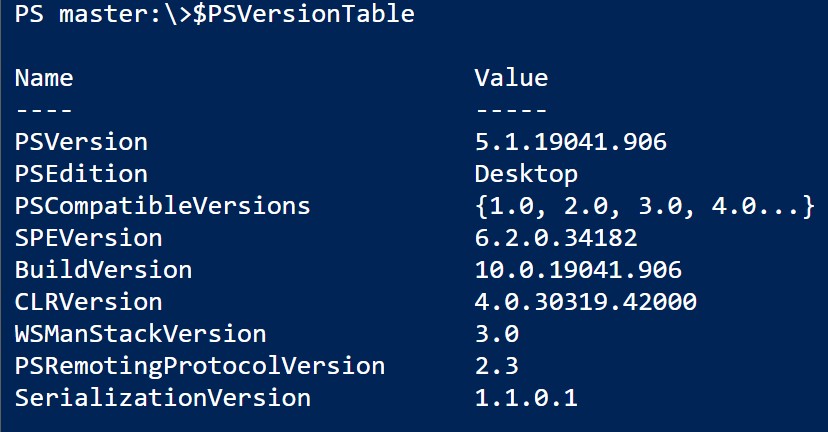
In my previous blog , we had discussed Installation of the PSE module with Sitecore and Out of The Box Tools. In this blog, I am discussing with you some basic development of PowerShell Command and Scripts. Determine PowerShell version: Execute the below command will give you the all the details of installed PowerShell like Version, Edition, SPE module version, etc. In my case, I have installed SPE module 6.2.   $PSVersionTable Directory and Text file: Create a Directory into the system. Write text into the text file and save that text file in the system directory. Get Sitecore Item: You can get Sitecore Item by Path, ID, Sitecore Query. I am giving you an example with Path. In the above, I have set parameter value -ErrorAction SilentlyContinue which means the Get-Item command will execute without any error shown on the console in case it does not found any item on the path.   Now you can perform various o

PowerShell with Sitecore and Installation: Part-1

Image
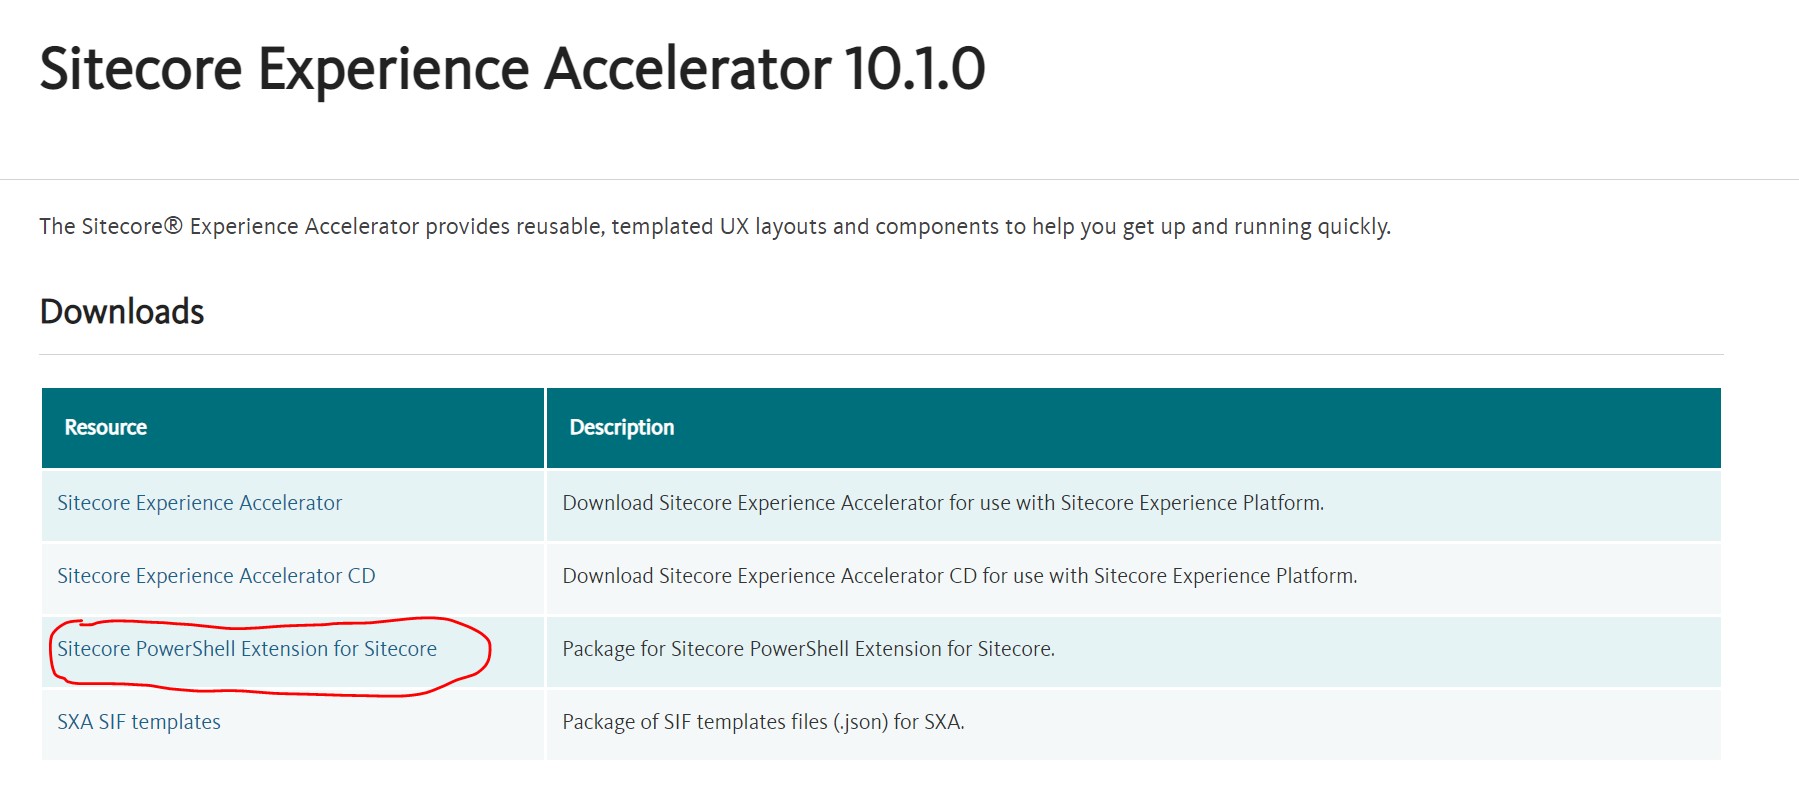
PowerShell is a modern command-line shell, or we can say Scripting language framework.  It is a more influential tool compare to the command prompt. Sitecore PowerShell module increases your productivity, performance and saves your development time. It’s developed by Adam Najmanowicz and Michael West. It does not install OOTB therefore you need to install it manually. Using this module, you can perform serval operations on Sitecore Items like Add/Update/Delete, Get Child Items, Bulk Updates, Publish Items, Delete Items on specific conditions, etc. Install SPE Module: Go to the Sitecore Download website from here and select the Sitecore Version. Once you elect, it will redirect to the download section. Here I am selecting Sitecore Experience Accelerator 10.1.0, click on the link and it will redirect you to the  download section . Download the Sitecore PowerShell Extension for Sitecore. Install the Sitecore PowerShell