Posts

Sitecore Media in Database Vs. File Directory Vs. Blob Storage

Image
We understand that Sitecore provides an option to store media library assets either in DB (defaults to DB) or in the filesystem or we can store it in the Azure Blob Storage. But the question is what is the best option from all three options and why? Here in this blog, I will discuss the pros and cons of all three options and help you to find the best possible option. 1. Sitecore Database: By default, Sitecore provides this option while uploading the media items to the Sitecore Media Library. If you will delete the Media item from the library, it will be deleted from the Sitecore database and Sitecore also provides a database clean-up tool Cleanup database. 2. File Storage: To upload the media library assets (Image, Video, Pdf, etc) to the file storage you need to update the value of the following variable in the Sitecore. config file: <setting name="Media.UploadAsFiles" value="false" /> Set it to true. <setting name

Sitecore Technology MVP Journey 2023

Image
Getting the badge of Sitecore MVP the second time in a row particularly in Technology for me is one of them. My journey for Sitecore MVP begins in the Year 2019. I commenced with Sitecore Technology blogs , and actively participate in the Sitecore Stack Exchange Platform , Sitecore Slack Channel , and SUGCON public speaking. I am honored to be named Sitecore Technology MVP 2023 . I feel fortunate to be participating with a Sitecore Community, Technology, and Product. I am happy that my all efforts and contributions are recognized by Sitecore and Community. My next focus for this year would be: Exploring more in Sitecore Project including Personalize and CDP, Content Hub, and XM Cloud. Continuing with sharing and helping others in Sitecore Community. Participating in Sitecore MVP mentorship program. A big thanks to my family, colleagues, and Sitecore Team, and congratulations to all the Sitecore 2023 MVP award winners. Happy Sitecor

Basic Authentication in Sitecore 10

Image
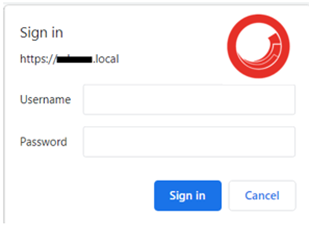
Wish you all a very Happy New Year 2023😊 In today’s blog I will discuss the basic authentication implementation is Sitecore 10. Basic Authentication may be required for you to protect and restrict the page, and website access from the external source or you can apply it on the UAT, staging, or prod before going live. You can implement it multiway either by Sitecore Pipeline or Global.asax page. Here I will describe the Sitecore pipeline approach, issues, and solutions. I would like to give the credit to the original blog post mentioned here , but in Sitecore 10 you will need to perform some extra steps that I will describe in this blog. Pipeline: Config file: After execution of it, you will get the below infinite loop issue: Solution: Add the below key in your web.config : <add key="owin:AutomaticAppStartup" value="false" /> Next, you will get the credential windows and after entering it, it will show

Upgrade Sitecore Project to Version 10.2

Image
This year, I got the opportunity to work on upgrading Sitecore projects from Sitecore versions 8.2, and 9.X to Sitecore version 10.2. To find the complete details with the steps Sitecore provides Sitecore SC-XP-10.2.0-Upgrade-Guide for Sitecore experience platform 10.2 from Sitecore Experience Platform 8.1.0 or later. You can refer to this PDF file and start working on the upgrade. While upgrading the projects I have written my all findings, issues, research, and solutions in individual blogs. That you may or may not face while upgrading your project. In this blog post, I am summarizing all these within a single blog. Upgrade the framework and Database: Dot NET Framework Migrator: To upgrade Sitecore from a lower version to Sitecore 10.2, you need to change the .net framework to 4.8. See the blog post- Dot NET Framework Migrator Upgrade Sitecore XP Database to the XM: The database upgrade is one of the most

Upgrade Sitecore XP Database to the XM

Image
The database upgrade is one of the most important steps while upgrading the Sitecore version to the latest 10.2. Sitecore provides its upgrade guide for Sitecore experience platform 10.2 from Sitecore Experience Platform 8.1.0 or later. Here in this blog, I have taken reference to the pdf document provided by Sitecore SC-XP-10.2.0-Upgrade-Guide and I am going to discuss only the database upgrade steps for the XM topology. Prerequisites for upgrading: Back up the database. Download the Sitecore 10.2.0 rev. 006766 (upgrade files).zip  It contains: Database Upgrade Script.zip - contains the SQL scripts that upgrade the database schemas and data. MarketingDefinitionsUpgrade.zip – contains the .aspx pages that help you prepare your marketing definitions for the upgrade from Sitecore XP 8.x. Download the tools Sitecore.UpdateApp 1.2.0 for Sitecore X.X.X rev XXXXXX.zip Y

Slowness and Performance Issues and Solutions in Sitecore MCS

Image
After deploying the application on Sitecore Managed Cloud Service(MCS) CM and CD instances, both environments were unresponsive and taking too much time to respond. To observe the issue and find the reason behind the issue you can perform the following operations. I am explaining the reason and the solution in this blog post. Here for better understanding, I am taking an example of one instance that is CM. Collect a performance Profile from the CM server: To investigate the issue in detail you can collect a performance profile. This will affect the performance of the CM server during profile capture. To collect the performance profile you can refer to the Sitecore KB article: Collecting a Performance Profile Razor Generator Tool: Sitecore stores compiled code in the Azure file system which is known to be slow due to relying on Blob storage internally. You can pre-compile all custom views via the Razor Generator tool

Add Custom Fields in SOLR Index on Crawler

Image
While upgrading the project from Sitecore version 8.2 to 10.2 I faced one scenario to convert the Lucene Search configuration to the SOLR. It’s easier to convert the Lucence configuration to the SOLR if all configurations are defined in the configuration files. You just need to change the type to the Solr Provider and configuration to the defaultSolrIndexConfiguration or if it does not default then define the custom Solr Index configuration . The problem occurs when the index file is generated at runtime and custom fields are added dynamically either on the pipeline or Search Crawler. In my case in Sitecore 8.2 lucence configuration fields were added in the document at runtime on SitecoreItemCrawler . Custom Crawler: Code was written on the custom crawler: Solution: To resolve the above issue and find the solution, I have explored Sitecore.ContentSearch DLL and found out it provides the below method in the IProviderUpdateContext interface.

Sitecore Identity Server: Sorry, There Was an Error

Image
After restoring the upgraded database to the SQL, I tried to login into the Sitecore CMS. The identity server comes with an error " Sorry, there was an error " after successful login. I have checked the Identity server logs files and found the error:  CORS policy execution failed . Solution: Go to the {root-directory}\project-identityserver.local\Config\production and open Sitecore.IdentityServer.Host.xml file and verify the database name. If it is corrects, then check the <AllowedCorsOrigins> section. In my case it was related to the database name, I forget to update the database name and connection string in the identity server. Note: Do not forget to recycle the Identity Server App pool. Happy Sitecoreing  ðŸ˜Š

Sitecore Azure CDN Setup for Media

Image
Sitecore website performance will impact if you have a large number of media items on pages and it comes from the media library. To increase performance, use a Microsoft Azure® Content Delivery Network (CDN) with Sitecore Media in your solution.  Here in this blog post, I am discussing how to configure the Azure CDN with your Sitecore solution so that your media library items are retrieved from the CDN and increase performance. If you are using Sitecore Managed Cloud Service then either you will already have CDN setup on your prod environment or you can create a service request to Sitecore to create an app service for CDN else you can refer to the Sitecore document about CDN setup considerations . Configuration In Sitecore: Before you can setup the Sitecore Media Library to use CDN in your solution you must have Sitecore XP or XM 9.1 or later CDN endpoint Step 1: Go to the path {your Sitecore root instance}\App_Config\Include\Examples

Dot NET Framework Migrator

Image
While upgrading Sitecore to the latest version, updating the project framework is one of the major tasks. For example, If you are planning to upgrade Sitecore from a lower version to Sitecore 10.2 then in your visual studio you need to change the .net framework to 4.8. It is an easier task just to right-click on the project, go to the properties and select the Application option and change the Target framework. But this job becomes tedious if your Visual Studio Solution file has a large number of projects especially if it's a Helix-based solution. You can use an open-source Visual Studio extension tool named Target Framework Migrator . It Migrates all your .Net projects to another .Net Framework Version at once. With this extension, you can update all projects with one click. Once you install this tool it will be available in the Tools menu. Once you click on the Target Framework Migrator options, then in popup windows select the target .ne

Cache Tunning in Sitecore

Image
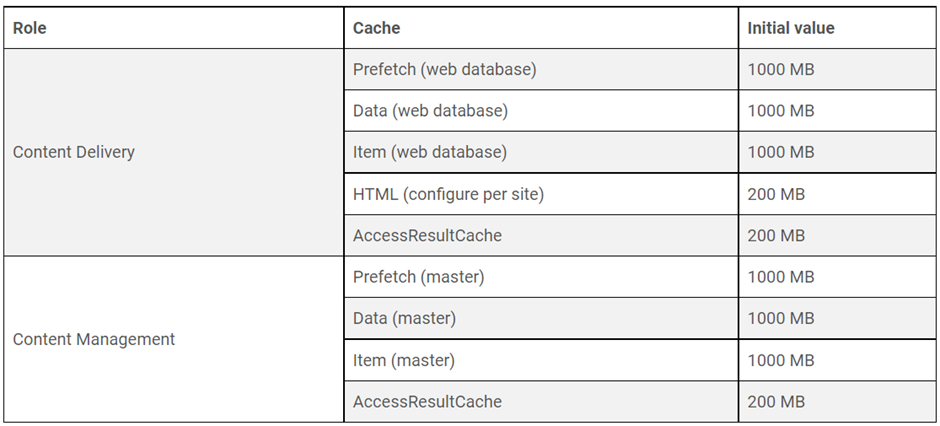
To increase the performance of the Website, or the current cache size are not enough for load then we need to follow the cache tunning procedure. A Sitecore cache consumes memory based on the amount of data stored in the cache. Cache size defines the maximum application memory the cache can consume. The following instructions apply to all Sitecore caches. The very first steps are to ensure that we have set the initial cache values before tunning. Use the following table as a starting point for database and HTML output cache values. Set initial cache values before performing cache tuning procedures. Before configuring the initial values, go to the cache admin page using sitecore/admin/cache.aspx page you can verify that the values are the same or different. In this blog, I will describe How to add set initial cache values using patch files. How to patch: Add the below patch file to your project. The below patch file has a patch for Prefetc