Sitecore Content Serialization With CLI: Part-2
Sitecore Content Serialization is the development process, in which we move content changes between different environments. It allows us to pull, push, publish items and create packages for the various environment.
With the release of Sitecore 10 came two new tools that support content serialization—the Sitecore Command Line Interface (CLI) and Sitecore for Visual Studio. In the Sitecore content Serialization using CLI developers need to configure modules, a set of rules to control what item you want to serialize and how you want to control the pull, push, and other option in your project.
In the continuation of my previous blog on Sitecore Command Line Interface, in this blog, I am going to discuss with you Sitecore Content Sterilization using CLI.
Install Sitecore Management Service:
Sitecore Management Services is a package that you must download and install in your Sitecore Content Management (CM) instance to support Sitecore Command Line Interface and Sitecore for Visual Studio.
To install Sitecore Management Service in CM Download the Sitecore.ManagementServices package file from the Sitecore Downloads site. On the Sitecore Launchpad, click Control Panel, and Install a package. Then follow the Installation Wizard to install the Sitecore.ManagementServices package file.
Once you have Sitecore CLI installed, you can use it to log in to your environment. Follow the instructions below to log in as either a user or a client and start with Sitecore Content Serialization:
Step 1: Log in with the following command:
dotnet sitecore login --auth https://<identity.authority> --cm http://<sitecore.backend.instance> --allow-write true
To log in as a user, you must have the following:
- The URL of the identity authority (the Sitecore Identity Server or another identity service
- The URL of the Sitecore instance
- Your username
- Your password
Now update the above command with the required details and run the command:
dotnet sitecore login --auth https://sc102identityserver.local --cm https://sc102.local --allow-write true
Step 2: Allow Access:
The dotnet sitecore login command opens a login web page in your browser. Enter your username and password, then click OK.
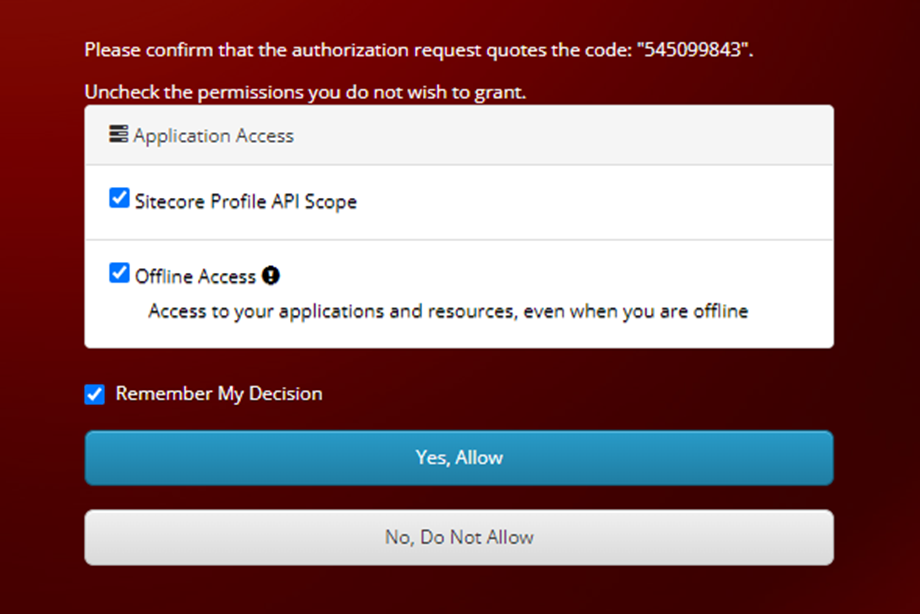
Step 3: Verify the Access Token:
Go to the user.json file in .sitecore folder and verify the access and token. The Sitecore login command will store your login arguments in the user.json file together with an access token.

Step 4: Create a folder and Sitecore Content items:
Create the folder structure to organize your modules. In your project folder, navigate to the /src folder and create a blank folder titled TextModule. Now that you have created the folder structure, you can create some test items to practice serialization.
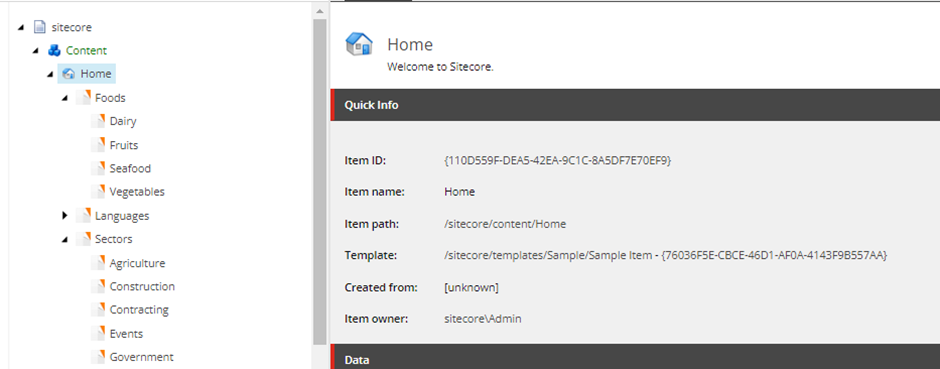
Step 5: Create/Edit Sitecore Content Serialization Module:
Modules are sets of includes—rules that determine what you want to serialize and how you want to interact with things you pull and push in your solution. Create a module text (.json) file with the following properties:
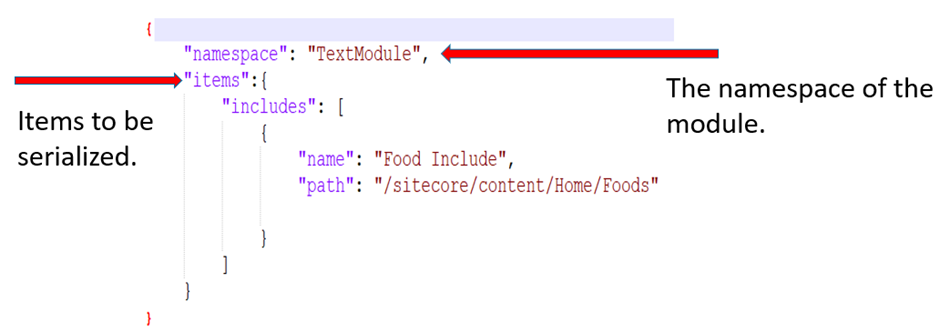
Allowed Include Properties
An include indicates which section of the Sitecore content tree to serialize. When creating an include, you can indicate the path, path length, database, scope, and allowed push operations of items that you want to be serialized. Modules can contain more than one includes, depending on the complexity of your serialization needs. Read through the table below to review a list of the allowed included properties.
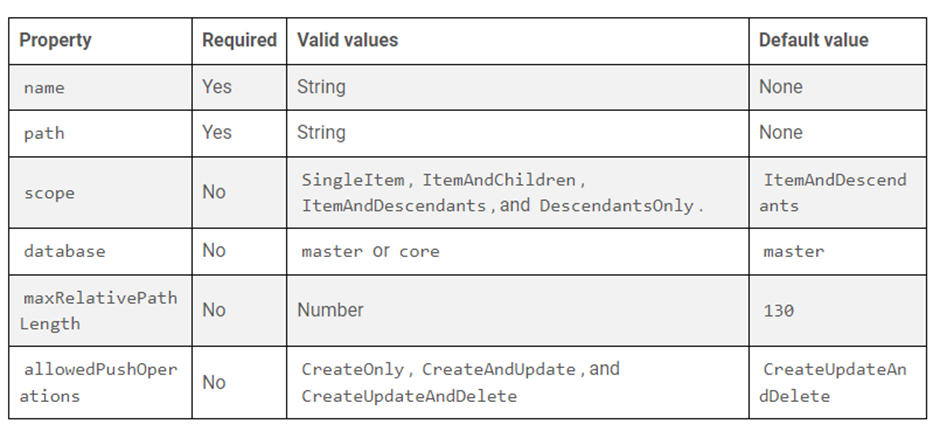
The name property sets the name of the include, and the path property of the include sets the path that serialization will take down the content tree. The scope property indicates the extent of your include, and the database property sets the database your items are in. Lastly, the allowedPushOperations property sets the abilities of the include; in the following include examples, we will set this property so that items can be created, updated, and deleted during serialization.
Rule Properties
Rules are created to modify the behavior of an include, which can have multiple rules. The order of the rules dictates the order the rules are evaluated. Read through the table below to review the list of rule properties.

The path property indicates the path to the item or items you are referring to in the content tree. The scope property indicates to what extent we are serializing the item(s) in the content tree path. The string property allows you to identify the item(s), and the allowedPushOperations property indicates what will happen to the item(s) during serialization.

Step 6: Update module property in sitecore.json file:
Navigate to the sitecore.json file. Under "modules", you will see "src/Items.module.json". Change this to "src/*/*.module.json"

Note: The Sitecore.json file is used to control how Sitecore serialization behaves. The modules section of this file is used by Sitecore serialization to locate all modules in your solution. The default configuration only refers to a single module, but we can change it to use wildcards (*/*) to locate all modules in your solution.
Step 7: Serialize Items:
Now that you have built out your Sitecore Content Serialization modules and modified them with includes and rules. Open up Powershell as an Administrator and navigate to your solution folder (or access your Visual Studio Code project terminal) and start to serialize your items using the below commands:
dotnet sitecore ser pull Serializes content items from a Sitecore instance to your file system.
dotnet sitecore ser push Pushes serialized content items from your file system to a Sitecore instance.
dotnet sitecore ser pkg create -o <name of package> Creates a package of serialized content items.
dotnet sitecore ser package install -f <name of package> Installs a package of serialized content items in a Sitecore instance.
dotnet sitecore publish Publishes all content for the Master database to the Web database.
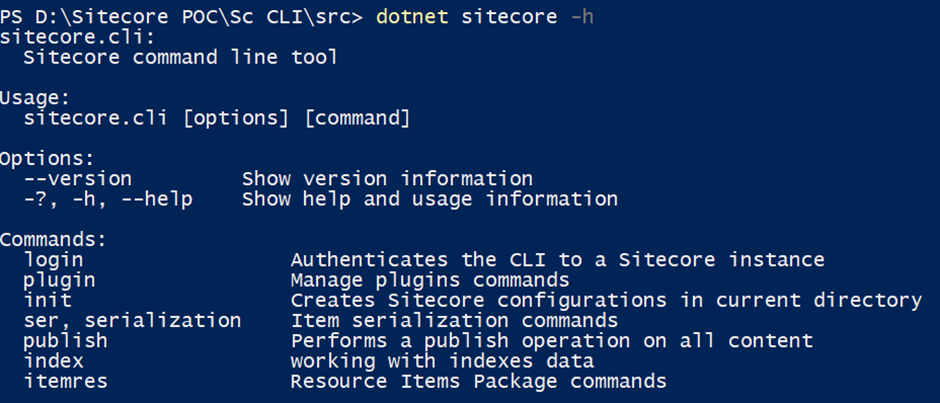
Using the –help or –h you can explore other commands in detail. For example, Run dotnet sitecore -h to learn about the various commands we can use.
Refer to the below Videos for Practical:
Video-1
Video-2
Other Sitecore CLI Commands:
dotnet sitecore ser validate For any validation error, you can run the below command to correct the most common issue.
dotnet sitecore ser validate --fix If a duplicate item finds then it deletes the old copy and keeps the version with the new name
dotnet sitecore ser watch Monitors change to content items in a Sitecore instance and automatically serializes the changes to
sitecore ser diff Compares the content items of two Sitecore instances.
Upgrade the Sitecore CLI interface:
If you already have a Sitecore CLI on your machine and want to update it to the latest version then follow the below command:
dotnet tool update sitecore.cli --version 4.2.0 Update to the version 4.2.0
dotnet sitecore plugin add -n Sitecore.DevEx.Extensibility.Serialization --version 4.2.0 Update to the version 4.2.0
dotnet sitecore –version Verify the installed version.
dotnet sitecore plugin list Verify the installed plugin list.
Happy Sitecoreing 😊



Sitecore Content Serialization simplifies content management by enabling smooth transfers between environments. To maximize its potential, businesses often Hire Sitecore Developers who ensure accuracy, scalability, and streamlined workflows, helping organizations maintain consistency while accelerating deployment cycles and improving digital experiences.
ReplyDelete