Multisite in Sitecore 10
Configuring a multisite in a Single Sitecore instance is an OOTB feature. It means you can share data, templates, rendering, and other items in the same Sitecore Content tree with two different website nodes. Each website node will have its tag and it's managed from Sitecore.Sites.config.
A single Sitecore installation, however, can publish any number of websites, each with its properties. The properties for each site are, by default, stored in the Sitecore Sitecore.Sites.config file.
The Sitecore Sitecore.Sites.config file includes a list of served websites listed in the <sites> section and the definition of the node will be defined into the <site name=”website” …/> tag. Sitecore parses incoming HTTP requests and selects the appropriate site based on the HTTP request parameters.
Step 1: Create a new site node into the content tree:
Create one more site node in the Sitecore tree. Best practice says each Site node should have its own Home and all content goes into that.

Step 2: Add a config patch file:
Go to the path {root directory of Sitecore Instance}\App_Config\Include\Examples and copy SiteDefinition.config.example file into the project under App_Config/Include folder. Remove the example extension from the file and update it with a new site definition. The following example adds a website called website2:
Note: You must define all attributes for each website that you add. Attributes can vary from version to version due to updates or new features in the product. Therefore, after any upgrade, you must check the attributes for the default site in Sitecore.Sites.config file, because there can be changes that require you to update the attributes of any added websites.
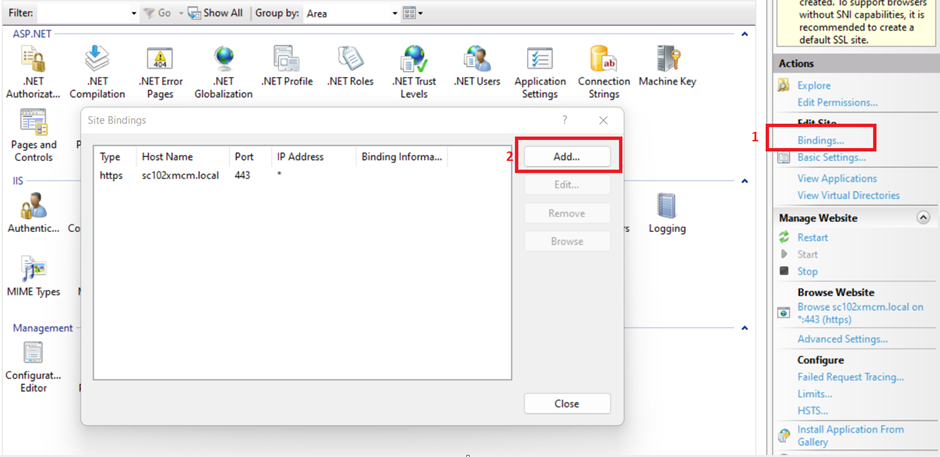
Step 3: Add a new website to the IIS: Go to the IIS and select the website, click on bindings from the right panel then click on Add button in the popup. Add a new website entry and click Ok.
Step 4: Add host entry: Add your new site name to the host file. Go to the path: C:\Windows\System32\drivers\etc
Open the host's file and add a new host entry:
127.0.0.1 website2.local
After completing all the above steps you can hit the new website URL into the browser and access the website.
You can also verify the same website entry into the /sitecore/admin/showconfig.aspx page.
In continuation of this series in my next blog post, I will discuss the important thing we need to take care of after setup multisite in Sitecore. Steps to be Performed after Multisite Configuration
Happy Sitecoreing 😊


Comments
Post a Comment