Posts

Pass Sitecore Items in .Net Class with Scheduler: Part-3

Image
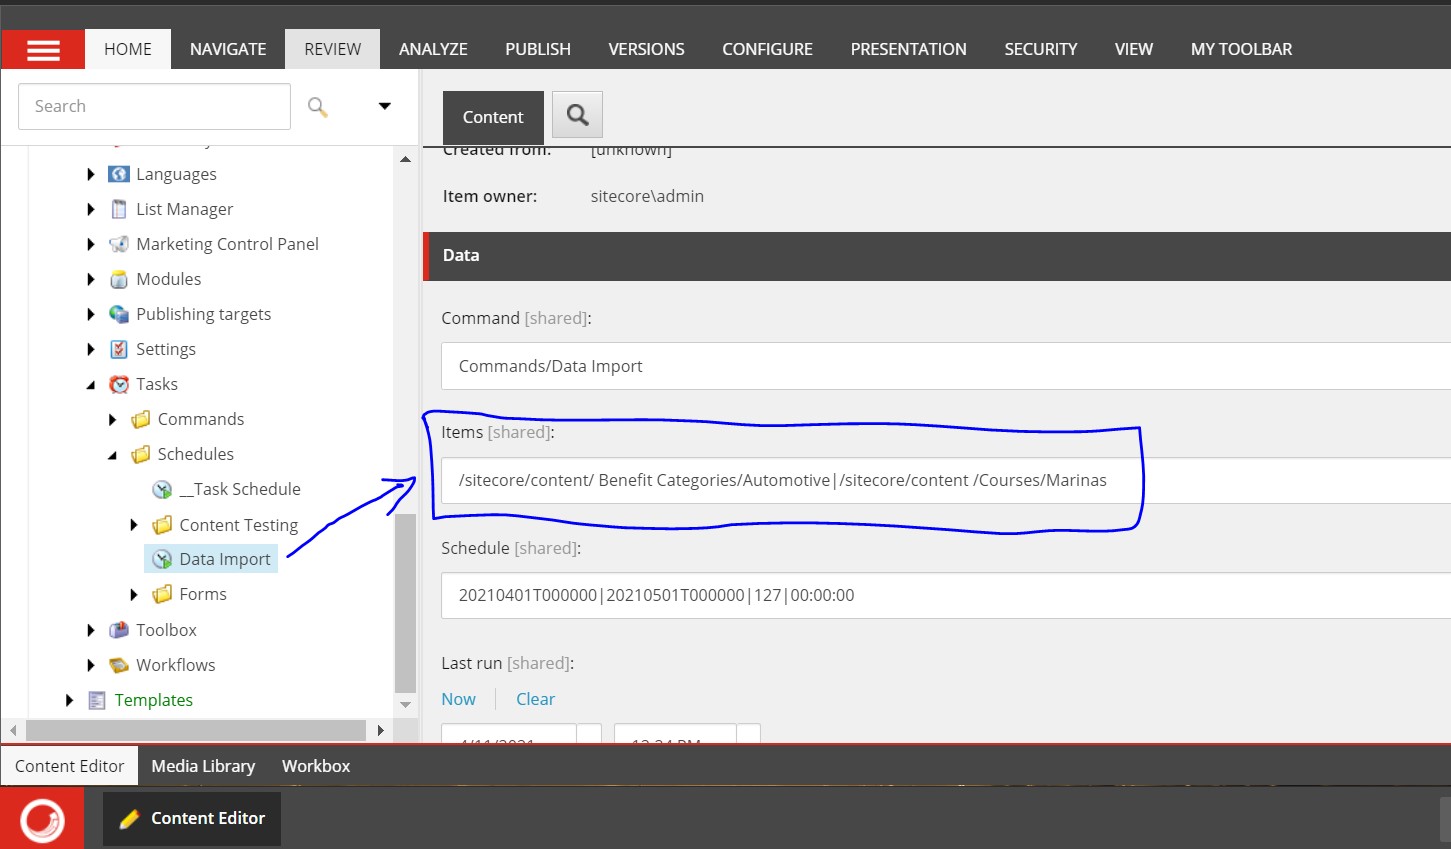
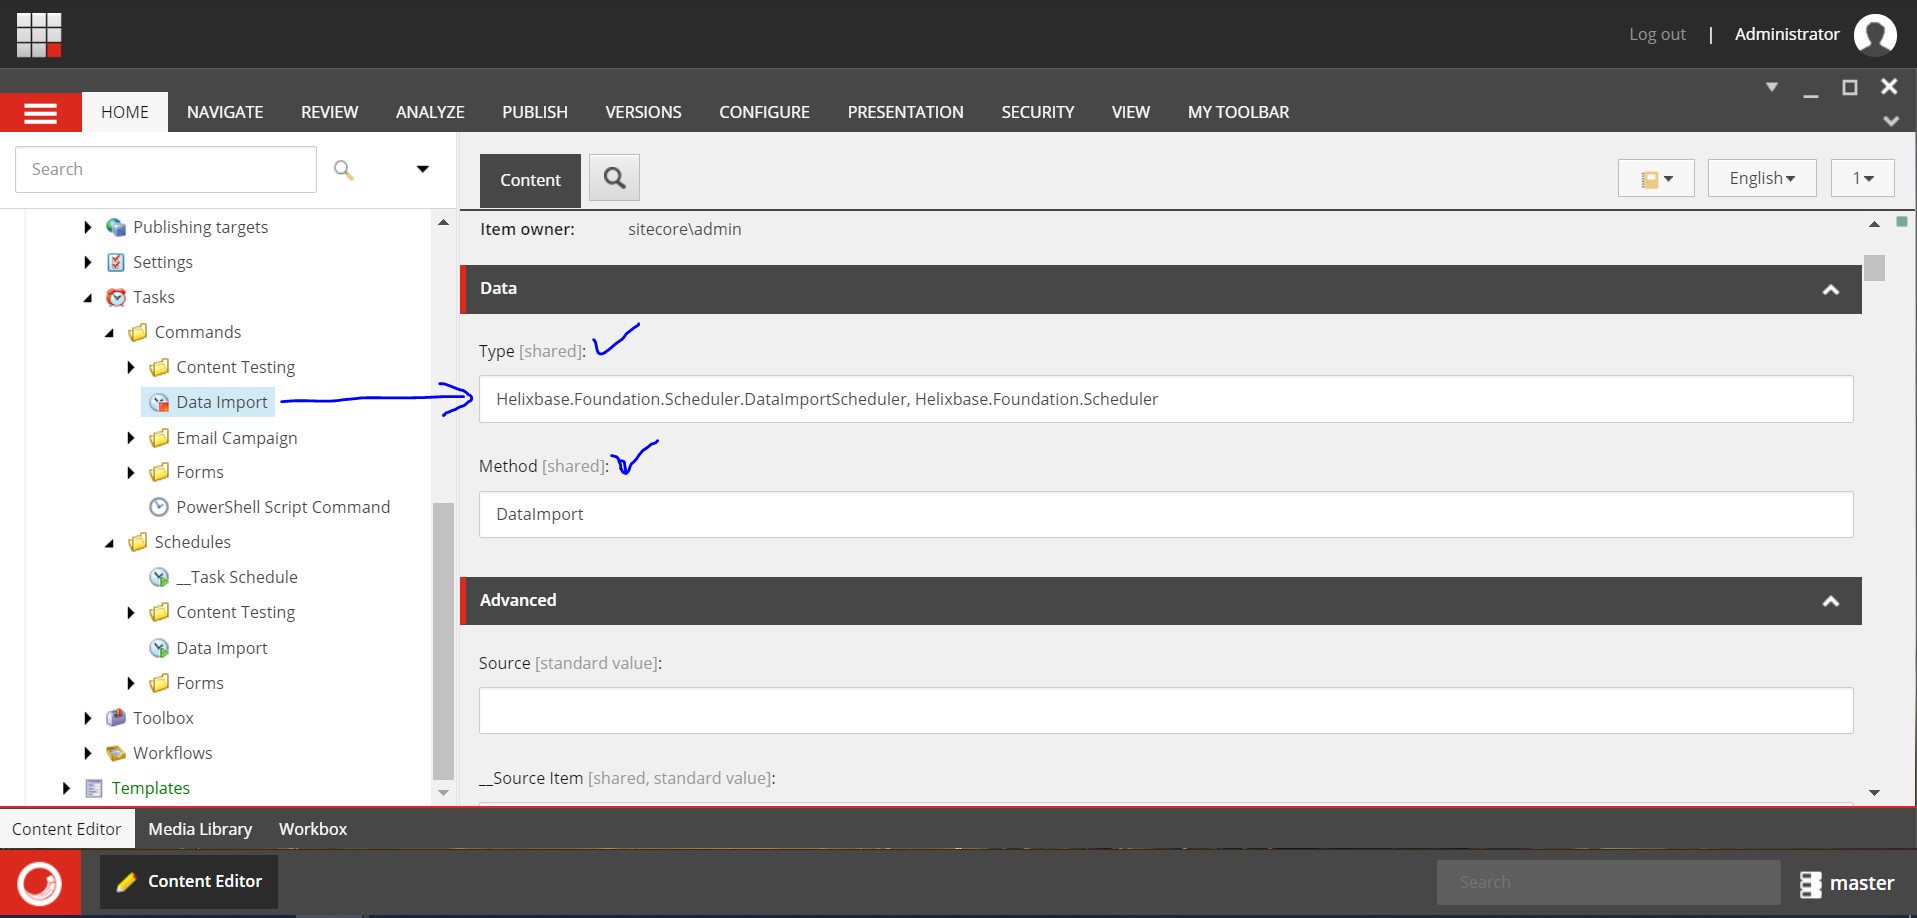
In my previous blog , we had discussed Create and Configure Scheduler in Sitecore . At the end of this series of Sitecore Scheduler blogs, I will discuss with you about Pass Sitecore Items in the .NET class with Scheduler. Suppose in your .Net class your scheduler logic has some condition based on the Sitecore Items field values and to access those values you can opt for one of the below options: Get the Sitecore Item by its Item ID and write the logic of the get the respective field value by Item as below: var scItem = Sitecore.Context.Database.GetItem(new ID("{11111111-1111-1111-1111-111111111111}")); var fieldValue = scItem.Fields["Field Name"].Value; In the above approach, you have restricted the user for a constant ID and in the case of multiple items, your line of code will increase. Pass Sitecore Items into the Items field and get the values of those Sitecore Items fields by code. In this approach, you can pass multiple items and dynamically you can change

Create and Configure Scheduler in Sitecore: Part-2

Image
In my previous blog , we had discussed Sitecore Scheduler . In this blog, I am going to discuss with you about How to create a scheduler in Sitecore and schedule it with the PowerShell interface. First, you need to write a class that will have the logic of functionality you want to execute.  namespace Helixbase.Foundation.Scheduler { public class DataImportScheduler { public void DataImport(Item[] items, Sitecore.Tasks.CommandItem command, Sitecore.Tasks.ScheduleItem schedule) { //Code here } } } The above piece of code will take three arguments: Array of Items Task command Item Task Schedule Item I will discuss with you more about the above three parameters in the next blog “Pass Sitecore Items”. Once you write your logic into .Net Class then you need to create Sitecore Command into Sitecore. Go to the path: “ /sitecore/system/Tasks/Commands ” and create a new command item. Right-click on the com

Sitecore Scheduler: Part-1

Image
In one of my projects, the client requirement was, to migrate data from an external Database to Sitecore Database and the import task should run automatically with a specific time interval on a scheduled day. In this blog I will discuss with you about Sitecore Scheduler in three sections: Sitecore Scheduler Create Scheduler in Sitecore Pass Sitecore items as a parameter in Scheduler As the name suggested, the scheduler is a task that gets executed with a defined interval in terms of the day, date, or can be a specific time in the day. There are three ways in Sitecore to schedule task in Sitecore CMS: Configure agent in web.config: It’s a very common and easy approach to create a scheduler in Sitecore. Using this approach, you have to restart the ASP.NET worker process as it requires changing into the web.config file. Create Window Task Scheduler or Window Service to call web service in Sitecore: In this approach, you can write a Window Service, or a Console application trigger it with

Install Sitecore Package

Image
To install Sitecore package you will need to perform below steps: Download Sitecore Package or zip file on your machine/hard drive. Login into the Sitecore Panel to which you want to install your Sitecore Package. Click on the Start Icon and select Development Tools and select Installation Wizard: After that you will get the Installation Package window same as below: Click on the upload button it provides you upload files popup window to choose files:

Install Sitecore 9.3.0 XP Scaled instance on Single Machine

Image
Before installing the Sitecore experience platform, you need to choose the correct topology of Sitecore scaled. Here I am going to select the Package for XP scaled instance. So, what is XP Scaled (XP1) topology in Sitecore? XP Scaled topology is if you are planning a fully-featured Sitecore Experience Platform installation. The Sitecore Experience Platform configuration runs the following separated server roles: Content Delivery Content Management Email Experience Dedicated Dispatch Server (optional) Sitecore Identity

Unicorn Login issue with Sitecore 9.2 Identity Server

Image
In one of my projects, I have installed Sitecore 9.2 and integrated it with my Visual Studio solution code file everything was working fine. When I was trying to sync Unicorn items with Sitecore, and I found Unicorn.aspx page is not working. After, I hit the Unicorn.aspx to sync Sitecore Items it shows error message Access Denied and You need to sign in to Sitecore as an administrator to use the Unicorn control panel . I selected the option Sign in to Sitecore as an administrator and it redirected me to the Sitecore Identity Server login page . I entered my username and password and it returned me to the Unicorn Control Panel page, but still, it was showing me the same error message as below:

Setup Multiple Node.JS using NVM and Issue

Image
NVM is a Node Version Manager for Windows. It is used to set up multiple installations of Node.js  on the window machine. Before getting started with NVM you need download NVM for Windows from here . Open Command prompt or Powershell in Administrator mode and run below command from development or project folder: $ nvm install $ nvm use Once you run above command you may get an error a message like " Invalid version " or it will not work as you are expecting. Then add  $(type .nvmrc)  at the end of the above command for example: $ nvm install $(type .nvmc) Now It will work as you expecting or again you will get an error message as below:

Reset Sitecore Admin Password using SQL

Image
In case you forget the Sitecore Admin password and you are not able to login into the Sitecore. Now the question is If you are not able to login into the Sitecore system then How can you rest the password? There is one solution to reset the Sitecore Admin password to “b” by SQL Server database.  Perform the below steps to reset the Sitecore Admin password to “b”: Login into SQL Server Database Go to the respective Core Database, open a new query window. Execute the below query. UPDATE      [aspnet_Membership]  SET      [Password]='qOvF8m8F2IcWMvfOBjJYHmfLABc=',      [PasswordSalt]='OM5gu45RQuJ76itRvkSPFw==',      [IsApproved] = '1',      [IsLockedOut] = '0' WHERE      UserId IN (         SELECT UserId FROM dbo.aspnet_Users WHERE UserName = 'sitecore\Admin'     )  The above script will reset Admin User Password to “b”. Happy Sitecoreing  ðŸ˜Š

Custom Personalization Rules in Sitecore 9

Image
Personalization allows you to deliver the target the component in which your visitor showing interest. For example, visitor visits or browse specific product feature, specification, details, etc. on website. So, you show personalized content to the visitor on the bases of his previous behavior on the website. You can create personalization rule on bases of The goal, Campaign, custom facet, etc. Your website will respond to the bases of above-defined rules and display or hide specific component or change its behavior. To start with custom personalization, you need to perform the below steps: Step 1:    Go to the path “ /sitecore/system/Settings/Rules/Definitions/Tags ” right-click on Tags and add new customize Tag (I have given a name CustomPersonalization):

Display Anonymous Contacts in Sitecore Experience Profile

Image
After installation of Sitecore 9 update 2, I observed that Experience profile does not show anonymous contact on experience profile but it exists in xConnect Database. To show to anonymous contact in experience profile we need to enable anonymous contact and perform the below steps: Step 1:  Go to the xConnect root path “ C:\xconnect root path\App_data\jobs\continuous\IndexWorker\App_data\Config\Sitecore\SearchIndexer” , o pen “ sc.Xdb.Collection.IndexerSettings.xml ” file and IndexAnonymousContactData to true as below: <IndexerSettings>     <Type>Sitecore.Xdb.Collection.Indexing.IndexerSettings, Sitecore.Xdb.Collection</Type>     <LifeTime>Singleton</LifeTime>     <Options>        <SplitRecordsThreshold>25000</SplitRecordsThreshold>        <IndexPIISensitiveData>false</IndexPIISensitiveData>        <IndexAnonymousContactData>true</IndexAnonymousContactData>     </Options> </IndexerSett