Posts

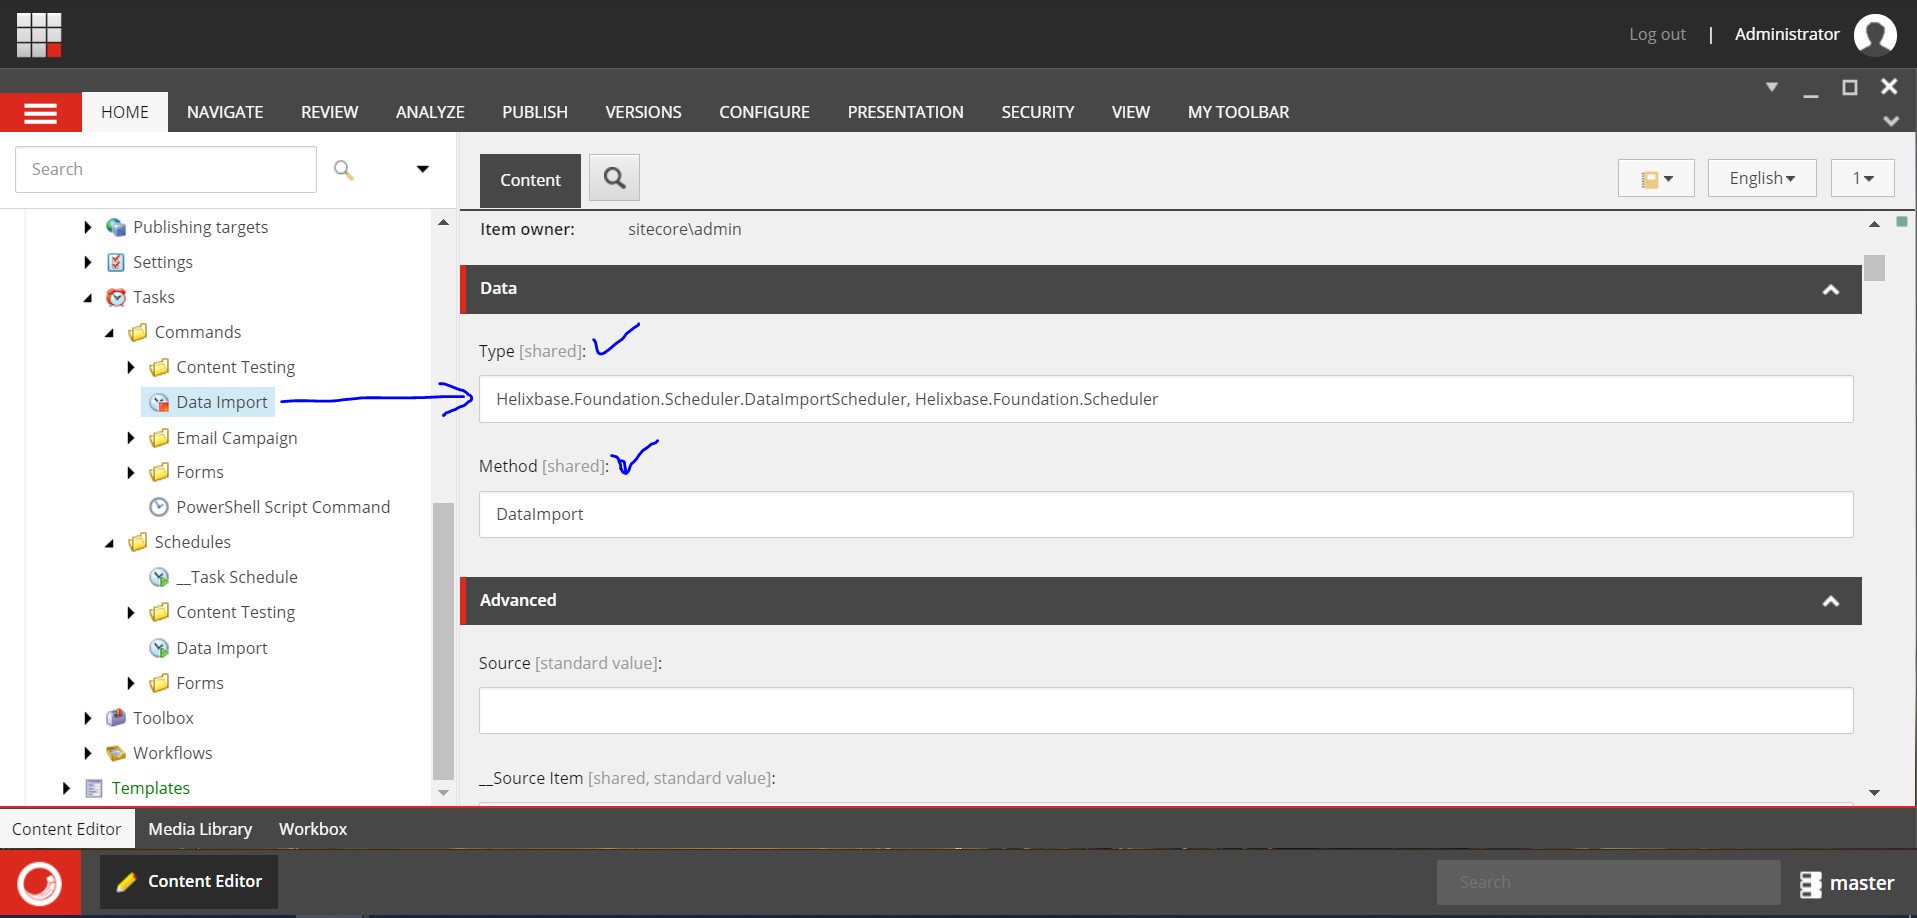
Wildcard Item in Sitecore

Image
If the Sitecore item name is an asterisk (*) then the item is called a wildcard. So, Wild Card is a special page in our Sitecore content tree represented by the item name "*". Reason to create Wild Card Page: If we need to create large numbers of the content page using the same page template then we must apply the same rendering and presentation details on every content page. It’s very hectic for a content editor to create several pages and manages those pages into a content tree. To overcome this issue Wild Card Page is the best solution in which our all the data source we reside outside of the home node, somewhere in Global folder and we will have only a single wild card page which will serve all the data source pages. Let’s quick start, I have some products Under the Global/Product Folder , and I am creating a single Wild card page for all the products, that will display the information on the product: Create a Wild Card page i

Sitecore Installation Error: Failed to Start Service 'Sitecore Marketing Automation Engine'

Image
 Error: [------- XConnectXP0_StartServices [2] : ManageService -----------------------] [XConnectXP0_StartServices [2]]:[Updating] sc903xconnect.dev.local-MarketingAutomationService Waiting for service 'Sitecore Marketing Automation Engine - sc903xconnect.dev.local-MarketingAutomationService (sc903xconnect.dev.local-MarketingAutomationService)' to start... Waiting for service 'Sitecore Marketing Automation Engine - sc903xconnect.dev.local-MarketingAutomationService (sc903xconnect.dev.local-MarketingAutomationService)' to start... Waiting for service 'Sitecore Marketing Automation Engine - sc903xconnect.dev.local-MarketingAutomationService (sc903xconnect.dev.local-MarketingAutomationService)' to start... Waiting for service 'Sitecore Marketing Automation Engine - sc903xconnect.dev.local-MarketingAutomationService (sc903xconnect.dev.local-MarketingAutomationService)' to start... Waiting for service 'Sitecore Marketing

Import CSV Data in Sitecore Using PowerShell: Part-3

Image
In my previous blog , we had discussed Sitecore PowerShell Command and Scripts. In this blog, I am discussing with you about How to Import CSV Data in Sitecore using PowerShell Scripts? To do the same you need to read the CSV file rows and create Sitecore Items into the Content Tree for each row then assign the column values of the row into the respective Item Field. There are two options: Write your own customized PowerShell Script and Import CSV Data. Use the inbuilt Data Importer tool that comes with Sitecore PowerShell Extension .  Option 1: Perform the Below steps to Import the CSV Data into Sitecore: First, you will need a CSV file. If you have Excel Sheet, then go to the File Menu and click on Save As option and change the format and save it into CSV format. Suppose you have a CSV file with the number of rows and each row has several columns with predefined values. Here I am taking the below CSV file for an

PowerShell Commands and Scripts for Sitecore Item: Part-2

Image
In my previous blog , we had discussed Installation of the PSE module with Sitecore and Out of The Box Tools. In this blog, I am discussing with you some basic development of PowerShell Command and Scripts. Determine PowerShell version: Execute the below command will give you the all the details of installed PowerShell like Version, Edition, SPE module version, etc. In my case, I have installed SPE module 6.2.   $PSVersionTable Directory and Text file: Create a Directory into the system. Write text into the text file and save that text file in the system directory. Get Sitecore Item: You can get Sitecore Item by Path, ID, Sitecore Query. I am giving you an example with Path. In the above, I have set parameter value -ErrorAction SilentlyContinue which means the Get-Item command will execute without any error shown on the console in case it does not found any item on the path.   Now you can perform various o

PowerShell with Sitecore and Installation: Part-1

Image
PowerShell is a modern command-line shell, or we can say Scripting language framework.  It is a more influential tool compare to the command prompt. Sitecore PowerShell module increases your productivity, performance and saves your development time. It’s developed by Adam Najmanowicz and Michael West. It does not install OOTB therefore you need to install it manually. Using this module, you can perform serval operations on Sitecore Items like Add/Update/Delete, Get Child Items, Bulk Updates, Publish Items, Delete Items on specific conditions, etc. Install SPE Module: Go to the Sitecore Download website from here and select the Sitecore Version. Once you elect, it will redirect to the download section. Here I am selecting Sitecore Experience Accelerator 10.1.0, click on the link and it will redirect you to the  download section . Download the Sitecore PowerShell Extension for Sitecore. Install the Sitecore PowerShell

Make Sitecore Field Read-Only

Image
In this blog, I will discuss with you How to make Sitecore Item Field Read-Only. Scenarios: I have fetched the data from an external Database and create Sitecore items into the content tree and update the field values of items in the Sitecore content tree. There are Sitecore jobs that will run periodically and perform the above operations, but content editors can update those data and we can lose the actual values. Solution: As you are aware that access rights are applied on Sitecore Items so to resolve the above issue, I made the Sitecore item fields Read-only. Find below the steps to make the Sitecore Items field read-only: Go to the respective items template and find the field which you want to make read-only. Here I am doing with the Title field: In the Ribbon Bar menu click on the View button and make sure that both Standard fields and Raw values checkbox are checked: Go to the security section in the right panel and insert the below text into that security[shared] field and sav

Pass Sitecore Items in .Net Class with Scheduler: Part-3

Image
In my previous blog , we had discussed Create and Configure Scheduler in Sitecore . At the end of this series of Sitecore Scheduler blogs, I will discuss with you about Pass Sitecore Items in the .NET class with Scheduler. Suppose in your .Net class your scheduler logic has some condition based on the Sitecore Items field values and to access those values you can opt for one of the below options: Get the Sitecore Item by its Item ID and write the logic of the get the respective field value by Item as below: var scItem = Sitecore.Context.Database.GetItem(new ID("{11111111-1111-1111-1111-111111111111}")); var fieldValue = scItem.Fields["Field Name"].Value; In the above approach, you have restricted the user for a constant ID and in the case of multiple items, your line of code will increase. Pass Sitecore Items into the Items field and get the values of those Sitecore Items fields by code. In this approach, you can pass multiple items and dynamically you can change

Create and Configure Scheduler in Sitecore: Part-2

Image
In my previous blog , we had discussed Sitecore Scheduler . In this blog, I am going to discuss with you about How to create a scheduler in Sitecore and schedule it with the PowerShell interface. First, you need to write a class that will have the logic of functionality you want to execute.  namespace Helixbase.Foundation.Scheduler { public class DataImportScheduler { public void DataImport(Item[] items, Sitecore.Tasks.CommandItem command, Sitecore.Tasks.ScheduleItem schedule) { //Code here } } } The above piece of code will take three arguments: Array of Items Task command Item Task Schedule Item I will discuss with you more about the above three parameters in the next blog “Pass Sitecore Items”. Once you write your logic into .Net Class then you need to create Sitecore Command into Sitecore. Go to the path: “ /sitecore/system/Tasks/Commands ” and create a new command item. Right-click on the com

Sitecore Scheduler: Part-1

Image
In one of my projects, the client requirement was, to migrate data from an external Database to Sitecore Database and the import task should run automatically with a specific time interval on a scheduled day. In this blog I will discuss with you about Sitecore Scheduler in three sections: Sitecore Scheduler Create Scheduler in Sitecore Pass Sitecore items as a parameter in Scheduler As the name suggested, the scheduler is a task that gets executed with a defined interval in terms of the day, date, or can be a specific time in the day. There are three ways in Sitecore to schedule task in Sitecore CMS: Configure agent in web.config: It’s a very common and easy approach to create a scheduler in Sitecore. Using this approach, you have to restart the ASP.NET worker process as it requires changing into the web.config file. Create Window Task Scheduler or Window Service to call web service in Sitecore: In this approach, you can write a Window Service, or a Console application trigger it with

Install Sitecore Package

Image
To install Sitecore package you will need to perform below steps: Download Sitecore Package or zip file on your machine/hard drive. Login into the Sitecore Panel to which you want to install your Sitecore Package. Click on the Start Icon and select Development Tools and select Installation Wizard: After that you will get the Installation Package window same as below: Click on the upload button it provides you upload files popup window to choose files:

Install Sitecore 9.3.0 XP Scaled instance on Single Machine

Image
Before installing the Sitecore experience platform, you need to choose the correct topology of Sitecore scaled. Here I am going to select the Package for XP scaled instance. So, what is XP Scaled (XP1) topology in Sitecore? XP Scaled topology is if you are planning a fully-featured Sitecore Experience Platform installation. The Sitecore Experience Platform configuration runs the following separated server roles: Content Delivery Content Management Email Experience Dedicated Dispatch Server (optional) Sitecore Identity