Posts

Sitecore Forms are Missing in the Forms Designer

Image
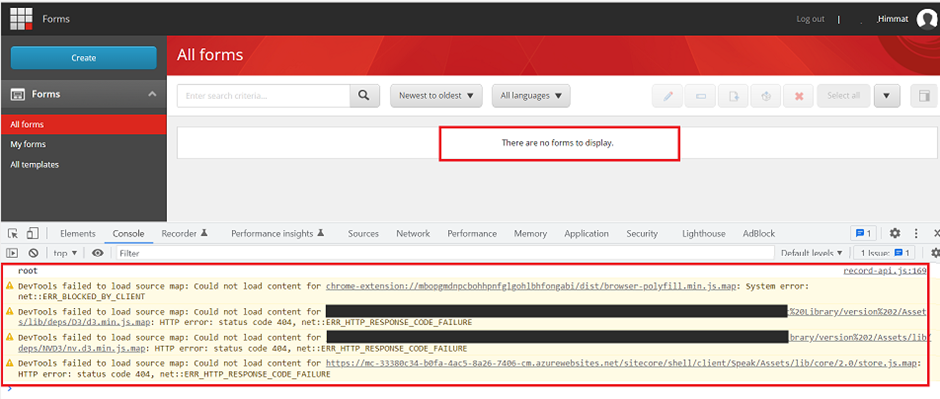
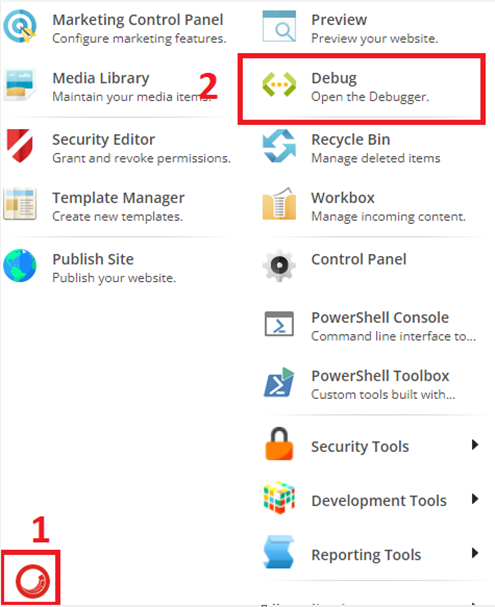
After upgrading the Sitecore version 9.0.2 to version 10.2. I faced one more issue related to the Forms that is I am not able to see any forms and its shows a message there are no forms to display. I have checked the console and logs as well but regrettably did not find any relevant error. I have checked the Forms node in the Sitecore content tree and all forms were there. Solution: Cleared browser cache Cleared Sitecore cache /sitecore/admin/cache.aspx Incognito/private mode to see if able to see the Forms Rebuilt Forms folder from the Developer menu (It solved my issue and happy to see the Forms in Forms Designer) If step 4 does not help you then go to the Control Panel, and choose the Indexing Manager option. Once you click It will open an Indexing manager window then opt for the selected indexes and rebuild Result: If you still face the same issue then you can check the other possible case:

SOLR Search Result Order Different due to the _val_:__boost function

Image
After upgrading the project to Sitecore version 10.2 , the SOLR search result is different in order due to the query _val_:__boost function . I have investigated the issue and found out that in Sitecore 9.0.2 our SOLR search query was: ..........AND (-_template:("083a4d2a38694013a9e2d18c05da70ae") *:*)) and in Sitecore 10.2 SOLR search query is: ..........AND (-_template:("083a4d2a38694013a9e2d18c05da70ae") *:*)) AND _val_:__boost There is one more extra condition at last in the query i.e. AND _val_:__boost. I have gone through the Sitecore documents on Search Result Boosting and found that  In Sitecore XP 10.0.0 or later, item-level boosting relies on index-time scoring factors that are indexed in the __boost field and combined with the query score using the query _val_:__boost function. After doing lots of brainstorming I raised a support ticket to the Sitecore and find the below solution: Solution: Sitecore suggested

Sitecore SwitchOnRebuild Feature With SolrCloud

Image
While rebuilding the index on your Sitecore CMS you may face scenarios where indexing data not populating in website search functionality, search stopped working, or slowdown. After completion of indexing again search functionality returns the results. Here Sitecore introduces the very nice concept of SwitchOnRebuild. To understand it assume you have two cores for your Sitecore index active and passive. It means when you rebuild the Active index Sitecore will return the result using the Passive index and after rebuilding Sitecore will switch the Active index to serve the results. It’s a concept of switching of Sitecore index during the rebuild of the particular index to avoid downtime and search unavailability. Recently when I was working on one migration project, when I deployed an application on the Azure Paas environment. I faced a similar type of issue while rebuilding the index it was throwing me the below error: Job started: Index_Update_IndexNa

Sitecore Content Serialization With CLI: Part-2

Image
Sitecore Content Serialization is the development process, in which we move content changes between different environments. It allows us to pull, push, publish items and create packages for the various environment. With the release of Sitecore 10 came two new tools that support content serialization—the Sitecore Command Line Interface (CLI) and Sitecore for Visual Studio. In the Sitecore content Serialization using CLI developers need to configure modules, a set of rules to control what item you want to serialize and how you want to control the pull, push, and other option in your project. In the continuation of my previous blog on Sitecore Command Line Interface , in this blog, I am going to discuss with you Sitecore Content Sterilization using CLI. Install Sitecore Management Service: Sitecore Management Services is a package that you must download and install in your Sitecore Content Management (CM) instance to support Sitecore Command Line Inte

Sitecore Command Line Interface: Part-1

Image
The Sitecore Command Line Interface is a new feature with Sitecore 10 and higher versions. It provides the ability to login into the remote Sitecore instance, serializes items, and publish, package, and additional commands reference for the command line. I have divided this blog post series into the below section: Configure Sitecore CLI on the workstation Sitecore Content Serialization with CLI Sitecore Content Serialization with Visual Studio You may have seen several blog posts, and videos on the same, but in this blog, I will make it easier for you and you do not need to set up the Sitecore project using Helix-base or getting a start template. In the first blog of the series, I will let you know about configuring Command Line Interface on the developer workstation. Once it will configure you can utilize another tool with Sitecore which is Content Serialization using CLI and Visual studio. Sitecore Command Line Interface (CLI) allows con

Getting Start With Docker: Part-1

Image
What is Docker? Let's say you created an application and it's working fine on your local machine, but in QA or Prod, it's not working properly. So, it's a common statement that it's working on my machine does not know why it's not working there😊. The reason can be libraries, version mismatch, framework, dependencies or you have upgraded any dependencies to solve the issue and forget, or any other reason and other developer machines and environments do not have all of these. Hence Docker Desktop is an easy-to-install application for your Mac or Windows environment that enables you to build and share containerized applications and microservices using containers. Docker is an open-source project for automating the deployment of applications as portable, self-sufficient containers that can run on the cloud or on-premises. In a container-based approach, the host operating system’s kernel and resources are directly shared by the con

Sitecore Debugger

Image
After successful implementation of the Sitecore project, page performance comes into the picture in the context of page load time, slowness of page, or rendering. There are many tools available online to investigate the website performance like PageSpeed Insights, JMeter, GTmetrix, Lighthouse, etc., but Sitecore provides its own tool for troubleshooting the Sitecore performance issue i.e., Sitecore Debugger. “If you don’t have a fast website, users will bounce faster you can say. Google recommended page load time is under two seconds, However, speeding up your website is no easy task.”- Google This tool finds out the problems related to slow rendering, and pipeline time is taken and provides the other details for rendering like data source, parameter, Profile, cache setting, output, etc. The debugger facilitates developers to scrutinize the output of both the rendering and the entire page. So that developer can take care of page performance issues while

Contact Profile Image Using Avatar Facet in Sitecore

Image
Sitecore xConnect provides several default facets like personal information, AddressList, EmailAddressList, etc. Avatar is one of them and it comes under the IContactPicture Legacy facet. If you are new with Sitecore xDB and xConnect and need more insight on the Custom facet, How to create and set/update the facet then you can refer blog post Work with Custom Facet in Sitecore and Create Custom Facet in Sitecore. In this article, I am going to describe how to set the contact picture in the Avatar facet which we can see in the details tab in the experience profile window. private bool SetAvatarFacets(byte[] imageBytes, string mimeType, Contact contact, IXdbContext client) { var pictureData = imageBytes; var pictureMimeType = mimeType; var avatar = contact.GetFacet<Avatar>(Avatar.DefaultFacetKey); //Facet is null if (avatar == null) { avatar = new Avatar(pictureMimeType, pictureData);

Uninstall Sitecore Instance Manually

Image
In this blog, I will let you know how to completely remove the Sitecore instance from your machine manually. While installing the new instance we face the error regarding SQL Server, Sitecore Identity Server, etc. To overcome this situation, perform the below steps to entirely clean the old Sitecore instance and you can go with a smooth installation of the new instance. Stop the IIS and remove the configuration: Open the IIS server and in the right panel Action tab click on Stop. Again, in the left panel right-click on the Sitecore instance and choose the Remove option. In the left panel go to the application pool, select all respective Sitecore Instance application Pool and choose the remove option from the right panel. For example, in this blog, I am deleting the "sc1011sc.dev.local" instance. Delete Sitecore Service: Go to the Service window, Press the Win + R key, it will open the run windo