Posts

Steps to be Performed after Multisite Configuration

Image
In my previous blog, I discussed Multisite in Sitecore 10 . In continuation of that blog, in this blog, I am going to discuss what are the other important things we need to take care of while renaming or adding a site. Add entries to the <cacheSizes> section for site-specific: For the default site named website, Sitecore adds cache sizes for the website site. While working on the multisite we set up one more site with a different name. Then you need to add a section with the site name and add the caching values for that site. Example: Your site name is Site1 then create a patch file and add the below configuration: Update the Preview.DefaultSite setting value for the additional Site: This setting specifies the default site to be used in Preview mode. For example, if you rename the standard 'website' site, and add e.g., site1, please cha

Partner Tech Advisor in Sitecore Support Portal

Image
What is a PTA Partner Tech Advisor, added to the Sitecore Support portal? Sitecore has recently launched the Partner Technical Advisory support service. The Partner Technical Advisor (PTA) team is a team of expert developers and subject matter experts who provide partners with pre-sales, sales, implementation, and ongoing support and advocacy. Getting started: How to engage a PTA using Service Now, Sitecore’s case management system: Navigate to the Support Portal and log in Click on Support Cases Click on Partner Technical Advisor in the gray horizontal navigation bar Complete the simple form and add attachments as needed Click Submit (Note: You will receive an acknowledgment via email) All correspondence must be conducted through Service Now Frequently Asked Questions (FAQs): Do I need to be certified to engage with a PTA? PTAs are intended to support partner resources who are already trained and certified

Multisite in Sitecore 10

Image
Configuring a multisite in a Single Sitecore instance is an OOTB feature. It means you can share data, templates, rendering, and other items in the same Sitecore Content tree with two different website nodes. Each website node will have its tag and it's managed from Sitecore.Sites.config.  A single Sitecore installation, however, can publish any number of websites, each with its properties. The properties for each site are, by default, stored in the Sitecore Sitecore.Sites.config file.  The Sitecore Sitecore.Sites.config file includes a list of served websites listed in the <sites> section and the definition of the node will be defined into the <site name=”website” …/> tag. Sitecore parses incoming HTTP requests and selects the appropriate site based on the HTTP request parameters. Step 1: Create a new site node into the content tree: Create one more site node in the Sitecore tree. Best practice says each Site node shou

500 - The request timed out error in Sitecore. The web server failed to respond within the specified time

Image
After Login on Sitecore CMS does not redirect to Content Editor and throws error 500 - The request timed out. The web server failed to respond within the specified time error. I have deployed our Application on PROD CM and CD instance on the Azure PAAS and the instance is working fine. When I try to log in to the CM instance, I can log in, but instead of redirecting me to the Sitecore Content Editor it's throwing me an error 500 - The request timed out. The web server failed to respond within the specified time. After logging into the CM site, the following error is displayed: 500 - The request timed out. The web server failed to respond within the specified time After login into the CM instance: I have verified the AllowedCorsOrigins and Redirect URL in the identity server and CM instance in both Sitecore.IdentityServer.Host.xml and Sitecore.Owin.Authentication.IdentityServer.config respective files and all are correct. The same code and depl

Sitecore Horizon Authoring and The SSL connection could not be established

Image
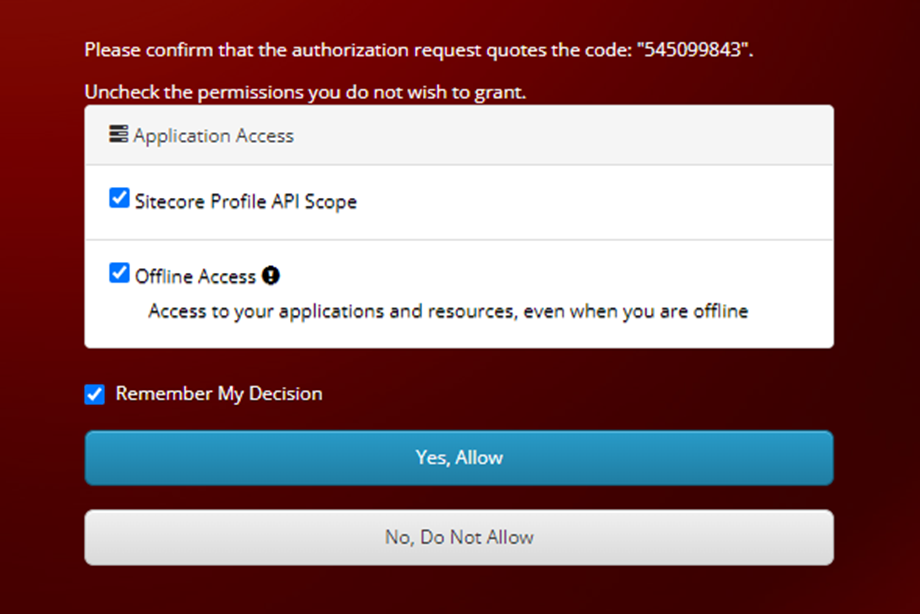
After successfully installing Horizon on Virtual Machine and solving the Horizon issue due to the URL binding in the IIS. And everything is working perfectly fine. Now it turns to Horizon URL binding and I have bound with a new URL name i.e., horizon.abc.com.  I opened the new Horizon URL in the browser and wait there is a new error I am getting, and it is related to the Authoring and SSL. If you want to install Horizon and facing some pre-post installation issues and looking for fixes, then my previous blogs can help you. Install Horizon 10.2 with Sitecore XM Sitecore Horizon Issue Pre and Post installation Issue 1: When I hit the horizon.abc.com in the browser, it’s redirecting me to the identity server URL for authentication and but after entering the credential it does not redirect me to the Horizon page. Solution: Go to the Sitecore Identity Server instance and open Sitecore.IdentityServer.Host.xml file {root directory}\ sc10

Sitecore Horizon Issue Pre and Post installation

Image
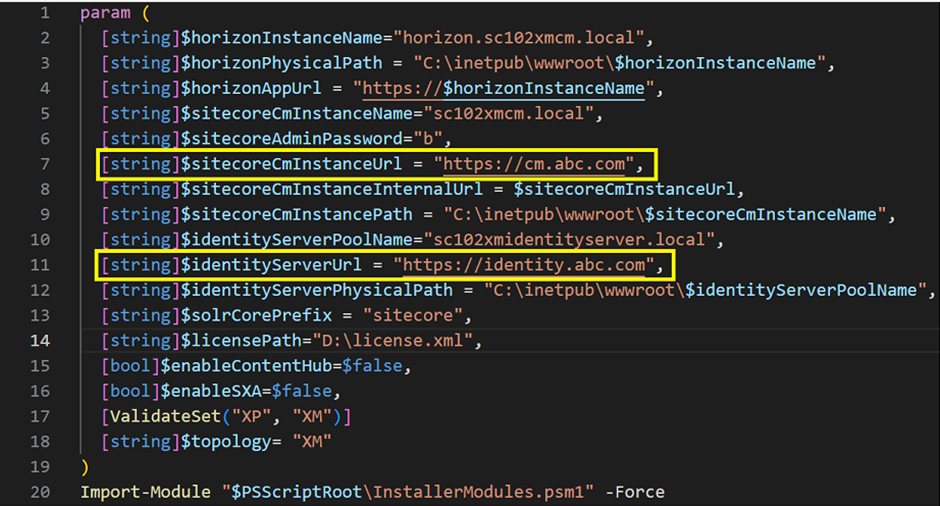
In my previous blog , I discussed with you the installation of Sitecore Horizon in Sitecore Experience Manager. In the continuation of this blog, I am going to discuss some common issues which I have faced while installing Horizon and after installation. Issue 1:  Authenticating Error This is the issue I have faced while installing Horizon on Virtual Machine. The reason behind the issue was we have done binding on the Sitecore instance URL and changed the URL name to expose it outside the VM. Example: My instance name was sc102xmcm.local and sc102xmidentityserver.local and we have updated the binding of the URL in IIS with cm.abc.com and identity.abc.com. Solution: To solve the issue you need to take care of the following highlighted parameter value in the InstallHorizon.ps1 file. Issue 2 : Search/Indexing issue: If your search in Horizon is not working. Solution: It is because the $solrCorePrefix parameter value you assigned in InstallHor

Install Horizon 10.2 with Sitecore XM

Image
There are plenty of documents and blogs available on installing Horizon with Sitecore XP Experience Platform  but this blog is related with install Sitecore Horizon with Sitecore XM Experience Manager . Horizon is the next-generation editor in the Sitecore Experience Platform. Horizon comprises two editing tools where you can create and edit content. Before installing Horizon, you need to install the below prerequisites for Sitecore 10.2: Install Sitecore Experience Manager 10.2 Make sure your Sitecore CM site is working correctly with the HTTPS protocol. Ensure Sitecore Identity is installed Install WebSocket Protocol installed in IIS If you are on a local developer machine: Go to the Turn Windows Feature on or off from the Programs and Features option in Control Panel. If you are on Virtual Machine: Go to Server Manager, and select the Add roles and feature option in the right

Sitecore Forms are Missing in the Forms Designer

Image
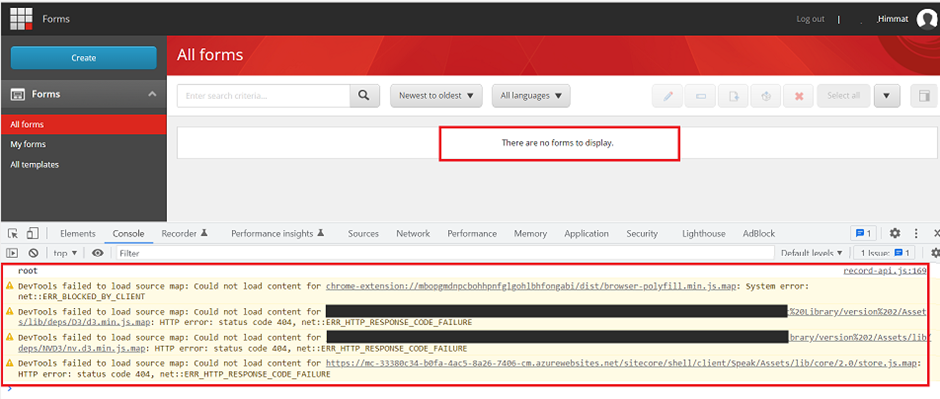
After upgrading the Sitecore version 9.0.2 to version 10.2. I faced one more issue related to the Forms that is I am not able to see any forms and its shows a message there are no forms to display. I have checked the console and logs as well but regrettably did not find any relevant error. I have checked the Forms node in the Sitecore content tree and all forms were there. Solution: Cleared browser cache Cleared Sitecore cache /sitecore/admin/cache.aspx Incognito/private mode to see if able to see the Forms Rebuilt Forms folder from the Developer menu (It solved my issue and happy to see the Forms in Forms Designer) If step 4 does not help you then go to the Control Panel, and choose the Indexing Manager option. Once you click It will open an Indexing manager window then opt for the selected indexes and rebuild Result: If you still face the same issue then you can check the other possible case:

SOLR Search Result Order Different due to the _val_:__boost function

Image
After upgrading the project to Sitecore version 10.2 , the SOLR search result is different in order due to the query _val_:__boost function . I have investigated the issue and found out that in Sitecore 9.0.2 our SOLR search query was: ..........AND (-_template:("083a4d2a38694013a9e2d18c05da70ae") *:*)) and in Sitecore 10.2 SOLR search query is: ..........AND (-_template:("083a4d2a38694013a9e2d18c05da70ae") *:*)) AND _val_:__boost There is one more extra condition at last in the query i.e. AND _val_:__boost. I have gone through the Sitecore documents on Search Result Boosting and found that  In Sitecore XP 10.0.0 or later, item-level boosting relies on index-time scoring factors that are indexed in the __boost field and combined with the query score using the query _val_:__boost function. After doing lots of brainstorming I raised a support ticket to the Sitecore and find the below solution: Solution: Sitecore suggested

Sitecore SwitchOnRebuild Feature With SolrCloud

Image
While rebuilding the index on your Sitecore CMS you may face scenarios where indexing data not populating in website search functionality, search stopped working, or slowdown. After completion of indexing again search functionality returns the results. Here Sitecore introduces the very nice concept of SwitchOnRebuild. To understand it assume you have two cores for your Sitecore index active and passive. It means when you rebuild the Active index Sitecore will return the result using the Passive index and after rebuilding Sitecore will switch the Active index to serve the results. It’s a concept of switching of Sitecore index during the rebuild of the particular index to avoid downtime and search unavailability. Recently when I was working on one migration project, when I deployed an application on the Azure Paas environment. I faced a similar type of issue while rebuilding the index it was throwing me the below error: Job started: Index_Update_IndexNa

Sitecore Content Serialization With CLI: Part-2

Image
Sitecore Content Serialization is the development process, in which we move content changes between different environments. It allows us to pull, push, publish items and create packages for the various environment. With the release of Sitecore 10 came two new tools that support content serialization—the Sitecore Command Line Interface (CLI) and Sitecore for Visual Studio. In the Sitecore content Serialization using CLI developers need to configure modules, a set of rules to control what item you want to serialize and how you want to control the pull, push, and other option in your project. In the continuation of my previous blog on Sitecore Command Line Interface , in this blog, I am going to discuss with you Sitecore Content Sterilization using CLI. Install Sitecore Management Service: Sitecore Management Services is a package that you must download and install in your Sitecore Content Management (CM) instance to support Sitecore Command Line Inte